

Table of Contents
** Minutes
Why using order tags might make sense for ecommerce
When should an order be tagged?
How to use order tags with ShipBob’s ShipStation integration
How to use order tags with ShipBob’s integration with Order Desk
When you run an online store, orders can be placed 24/7.
As your order volume grows, keeping orders organised can seem like a full-time job, especially if certain orders require extra attention.
If you have a warehouse staff or partner with a third-party logistics (3PL) company, it can be a challenge to communicate with your supply chain team on what to do with certain orders as they are processed and automatically routed to be picked, packed, and shipped.
If your online store requires a more robust order management solution, order tagging is an easy way to categorize orders based on custom rules and criteria to establish different order fulfilment workflows. That way, every order can be processed, routed, and prepared to ship based on the order’s specific needs and requirements.
In this article, you will learn:
- What order tagging is and how it works
- When to use order tags
- How order tags streamline fulfilment
What is order tagging?
Order tagging is the process of customising fulfilment workflows by organising orders based on custom rules created ahead of time to improve order accuracy without the need to constantly manage and evaluate every order as they come in.
Order tagging is a great solution if some orders require a different processing, fulfilment, and shipping workflow than others.
Order tagging can simply be used used to help merchants filter through orders by certain categories, or it can create a more customise solution by creating rules that determine what action to take for every order.
Whether you’re looking to tag orders by customer type, product, or to create different, automated fulfilment workflows, order tagging can be an easy solution to common fulfilment challenges.
Order tags are the customised labels you can manually create to identify, sort, and categorize orders, or trigger different workflows. Order tags help streamline supply chain management by reducing manual work later on in the process.
Why using order tags might make sense for ecommerce
Order tags are a great solution to maintain control over how every order should be managed. For instance, it can communicate specific rules to your picking team, such as whether or not the order contains fragile items.
Or, you can even take it a step further by categorizing orders based on customer type. For instance, if an order comes in from a returning customer that has spent a certain amount from your online store, you can create a tag to make sure those orders are fulfilled first, or you want to include a freebie with the order.
Order tags can also help you customise different fulfilment workflows, such as routing specific orders to a different warehouse based on its criteria.
Ultimately, orders tags are great for one-off situations that call for a simple or more complex solution to keep your fulfilment process efficient.
1. Identifying orders
An order tag can help you easily filter through orders based on a specific category. The categories can relate to type of customer, product, or order.
Other common order tags used by online stores are: high-priority, fragile items, backorders, requires insurance, and fraud risk. There are endless ways to establish an order tagging system that makes it easy for you and your team to identify orders quickly and more efficiently.
2. Keeping inventory organised
Another benefit to order tagging is the ability to keep your inventory organised. For example, you can use order tagging to specify which orders contain items that are backordered or out of stock. That way, you can easily view how many orders are being delayed or canceled due to an inventory stockout.
3. Streamlining fulfilment and shipping workflows
Let’s say you’re in the process of switching 3PLs. You can use order tags during the transition to make sure certain orders are routed to the old or new 3PL until the transition is complete.
Order tags can also be used to establish a self-fulfilment/outsourced fulfilment hybrid process, which makes it easy to get the support you need from a 3PL but also still manage some orders yourself.
For example, let’s say you have your own warehouse in the Northwest US and also have inventory stored in a 3PL’s Midwest or Southern US fulfilment location. You can use order tags to only route orders outside of the Northwest region to your 3PL, making it cheaper to fulfil them and reduce shipping costs.
Another example is to only store best-selling items that require a larger volume of units and fast fulfilment in a 3PL’s fulfilment centre, and tag orders that include those best-selling items only to be routed to the 3PL’s location to be fulfilled, which can help save on storage and/or shipping costs.
When should an order be tagged?
In some cases, order tagging isn’t a necessary task, but if there’s a retail fulfilment challenge you’re trying to solve, then order tagging can help.
There are several situations that can call for order tagging. How you use and set up order tagging is entirely up to you and your needs. To give you context on when it makes the most sense to use order tags, an order tagging system is commonly used if it:
- Reaches a certain weight limits
- Contains a specific SKU
- Includes a pre-order item
- Is being shipped specific destination
- Includes an items that is out of stock
- Includes items that are best-selling or slow-moving
- Was placed by a highly valued customer a best-selling or slow-moving item
- Should be fulfilled at a specific location or 3PL provider
- Is canceled to ensure it doesn’t get fulfilled
How to use order tags with ShipBob’s ShipStation integration
If you want to use order tags to easily manage inventory, orders, and shipping workflows, you can integrate ShipBob with ShipStation or through Order Desk (more on the setup for that below) to customise and automate shipping. Here’s how it works.
Step 1: Get in touch with ShipBob
To get started with ShipBob, you can request custom pricing here and a fulfilment expert will be in touch to help you get started.
Step 2: Connect your ShipStation account (or create a ShipStation account)
ShipStation can be used to bridge all your stores together and have all orders sync through one main portal. Or, ShipStation can connect with other online platforms and can work as a middleman for stores that cannot directly integrate with our dashboard. Either way, you can connect ShipStation with ShipBob to easily create and manage order tags.
Once you have a basic ShipStation account (which is very affordable), follow the steps below.
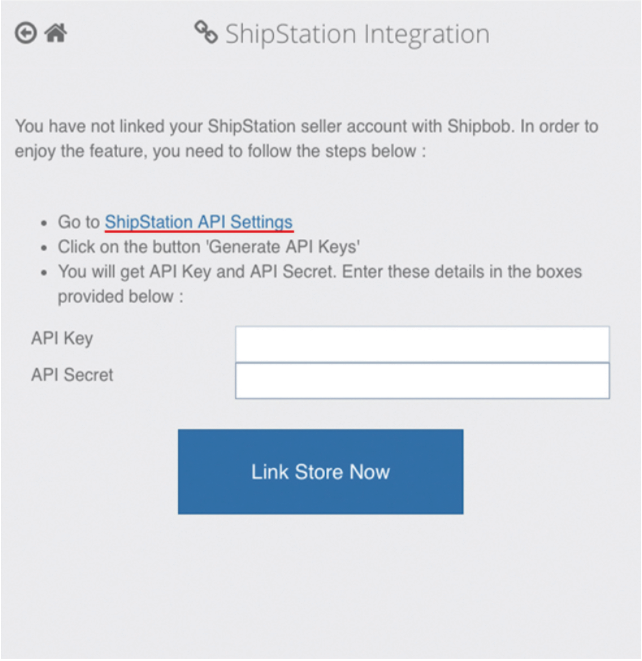
Click on ‘Store Integration’ from the ShipBob dashboard, select ‘ShipStation’ and click on ‘ShipStation API Settings.’ Once you type in the API key, click on ‘Link Store Now.’
Step 3: Create order tags in ShipStation
You can create order tags in ShipStation by using automation rules or to trigger an action. To create a tag, go to your ‘Orders’ page and click the ‘Tag’ menu, then click ‘Manage Tags.’
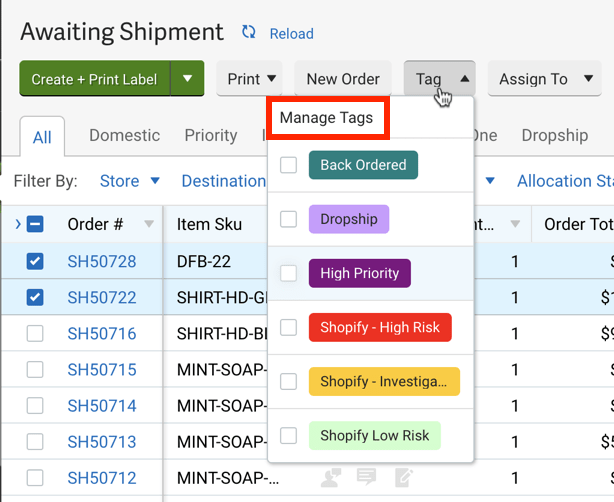
From there, click ‘Add Tag’ and type in the name of the tag. Then choose a colour to associate with the tag. To assign tags to existing orders, you can select multiple orders and add the associated tag. You can also add a tag to an order in its order details. From there, you will be able to view the different tags from the ShipBob dashboard.
You can learn more about how to create tags in ShipStation here.
Step 4: ShipBob picks, packs and ships orders
For the orders you want to be automatically routed to ShipBob, they will be sent to the nearest fulfilment centre location or location specified. From there, a picking lists is generated and ShipBob’s picking team efficiently picks and packs the order and prepares it for shipment.
From ShipBob’s dashboard, you can easily track orders in real time, so you can notify customers about the details of their shipment’s progress as it moves through the last-mile delivery process.
How to use order tags with ShipBob’s integration with Order Desk
If you’re looking to use order tags as a solution to customise fulfilment workflows, ShipBob integrates with Order Desk to easily create and manage custom rules and advanced workflows.
Order Desk’s drag-and-drop rules engine allows you to split, combine, skip, cancel, and modify orders based on almost any conceivable parameter. The rules can be chainable or duplicatable, making it much easier to process and manage different types of orders.
Step 1: Sign up with ShipBob
To use ShipBob as your fulfilment solution, you can request a quote here. From there, a fulfilment expert will reach out to provide more information on pricing, how to get started, and how Order Desk works with ShipBob.
Step 2: Connect your Order Desk account
Note: If you don’t already have an Order Desk account, you can try a 30-day trial. To get started, visit the ‘Apps & Integrations’ page from the ShipBob dashboard. Locate Order Desk and click ‘Get App.’
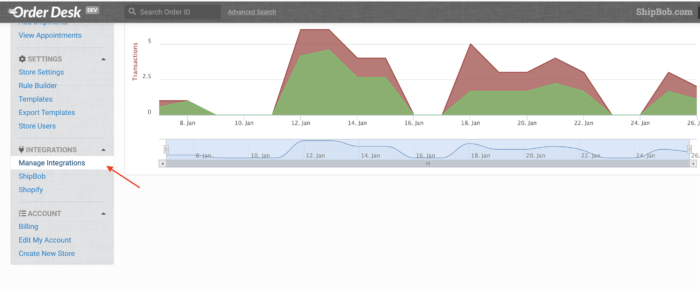
To connect Order Desk with ShipBob, visit your Order Desk dashboard and click on ‘Manage Integrations’ and then click the ‘ShipBob’ tile. You will be promoted to log into your ShipBob account and authorize Order Desk. Once you click ‘Allow’ you will be sent back to the Order Desk dashboard. From there, order data will automatically flow between the systems.
Step 3: Create custom rules and actions in Order Desk
Order Desk’s solution allows you to create custom rules and actions, which goes beyond creating simple order tags to further customise workflows. To get started, click on the ‘Rule Builder’ page from your Order Desk dashboard. Choose the ‘Rule Type’ to create specific action on an entire order or on certain items within an order.
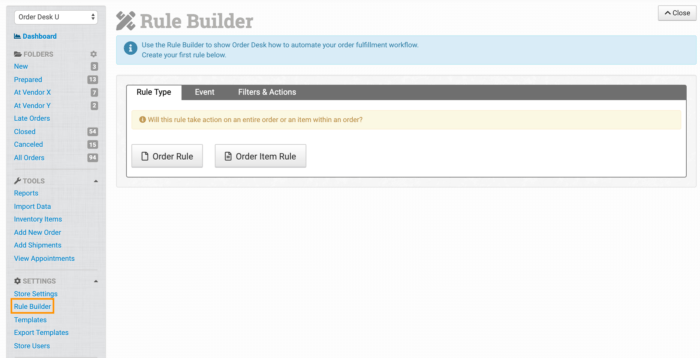
Click the ‘New Rule’ button in the top right corner.
Choose the type of rule you want to create from these options:
- Order Rule: to take action on an entire order.
- Order Item Rule: to take action on certain items within an order.
For a comprehensive guide on how to create rules in Order Desk, click here.
Once you create custom rules in Order Desk, the information will be sent to ShipBob’s dashboard, so you can view order status at a glance.
Step 4: ShipBob picks, packs and ships orders
Once orders are placed, they are automatically routed to the nearest ShipBob fulfilment centre location. From there, ShipBob’s fulfilment experts pick, pack and ship orders. After fulfilment, Order Desk sends tracking and order completion info back to the original source of the order.
Managing your ecommerce orders with ShipBob
ShipBob provides merchants with full visibility into the order management process. With ShipBob, you can easily keep track of all orders entering and leaving the fulfilment centre in real time.
From the ShipBob dashboard, you can:
- Sync, import, and create orders.
- Search orders and create filters according to the data you wish to see.
- Perform actions on a specific order or a segment of orders.
Once the order is placed, ShipBob handles everything from picking to packing, to shipping and returns management. This allows you to scale more quickly, affordably, and efficiently by focusing on more strategic business activities such as product development and brand growth.
If you need a more robust solution, ShipStation and Order Desk integrate easily with ShipBob’s technology to create a more robust ecommerce fulfilment solution, including the ability to create order tags or customise workflows. ShipBob also has a Developer API you can build into.
Conclusion
As you expand your business across distribution centres, new markets and sales channels, the ecommerce supply chain can get tricky. If you’re looking to solve for complexity in your fulfilment process and find ways to easily manage a high volume of orders, order tagging is a great solution.
But the best way to manage logistics operations is to simple outsource the fulfilment process to the experts. With ShipBob, you can save time, money and energy while establishing a flexible fulfilment solution that works for your business.
“I love that you can view orders based on when they are processing, completed, on hold, and in other stages. It is super helpful for us to have that and track the order every step of the way.”
Ines Guien, Vice President of Operations at Dossier
To learn more about how ShipBob works, click the button below.
Order tagging FAQs
Order tagging is an easy solution to help make order management more efficient. Here are answers to common questions about order tagging.
What is an order tag?

Order tags are customised labels that are created to distinguish different sets of rules and criteria based on what’s included in a single order. Some examples of different types of order tags include: high priority, fragile, backorder, requires insurance, or fraud risk.
How do I organise my online orders?
You can easily organise online orders by creating customised labels based on certain criteria or rules. For instance, if you want to call out orders that contain fragile items, then you can create a label for fragile orders. That way, when orders are ready to be packed and shipped, you can choose to prepare all fragile orders at once as they will require extra attention during the packing process.
How do you create an order tag in ShipStation?
ShipStation makes it easy to create colored indicators, known as order tags, for more efficient order management. There is no limit to the number of tags you use and they can be used in different combinations to streamline the shipping process. For a comprehensive guide how to create order tags in ShipStation, click here.


