

Table of Contents
** Minutes
WooCommerce shipping options made easy
Getting started with WooCommerce shipping (and how to set up your shipping zones)
How to set up WooCommerce shipping rates
How to set up shipping classes for product-specific charges with WooCommerce
What do you want to learn?
With over 60 million downloads around the world, WooCommerce has grown from a simple WordPress plugin to a fully customisable ecommerce platform. WooCommerce seamlessly empowers businesses to sell directly on WordPress — the CMS that powers 26% of all websites. Plus, WooCommerce offers a comprehensive suite of shipping options and settings, including the opportunity to work with fulfilment partners that can help you grow your business.
In this article, we’ll cover everything you need to know about shipping for your store, including WooCommerce shipping setup, shipping zones, and ecommerce fulfilment options.
WooCommerce shipping options made easy
On the backend of an ecommerce store, WooCommerce makes it easy for ecommerce sellers to calculate shipping rates based on zones and product weights. The platform offers a variety of tools to group products, automatically apply different shipping methods to different groups, and much more.
Regardless of whether you do in-house fulfilment or work with a third-party provider, following the steps in this guide will make sure that your WooCommerce shipping setup is simple, so you can start shipping orders ASAP.
Getting started with WooCommerce shipping (and how to set up your shipping zones)
If you’ve recently migrated your store, it’s especially important to double-check your shipping setup. Even if a WooCommerce migration expert handled the technical transition, shipping zones, rates, and product-level settings often need to be reviewed and optimised post-migration.
To complete your WooCommerce shipping setup, you need to create shipping zones, followed by shipping methods and rates.
A WooCommerce shipping zone is a geographical area where certain shipping methods and rates apply. Within WooCommerce, these can be as general as entire countries or as precise as specific postcodes. Each customer’s address can be associated with only one WooCommerce shipping zone.
You can set up as many shipping zones as you like, as well as add different shipping methods and rates to each zone.
Your WooCommerce shipping zones and methods determine where and how you ship your products. To set up these WooCommerce shipping options, follow the steps below.
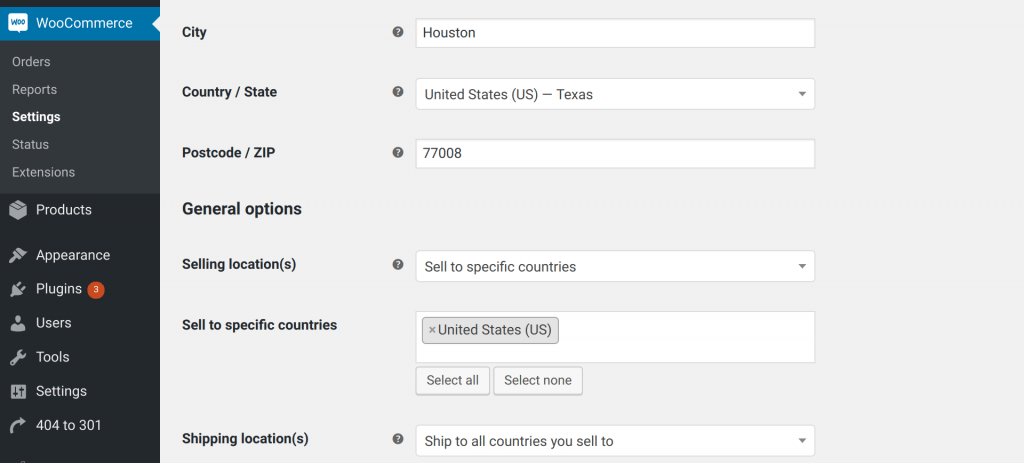
1. Go to “Shipping location(s)” in the dashboard
First, head to your WordPress dashboard, then navigate to WooCommerce > Settings. About halfway down the page, you should see a field marked “Shipping location(s).” This is where you can indicate which countries you ship to. Most sellers choose to ship to all countries that they sell to, which is the option shown below:
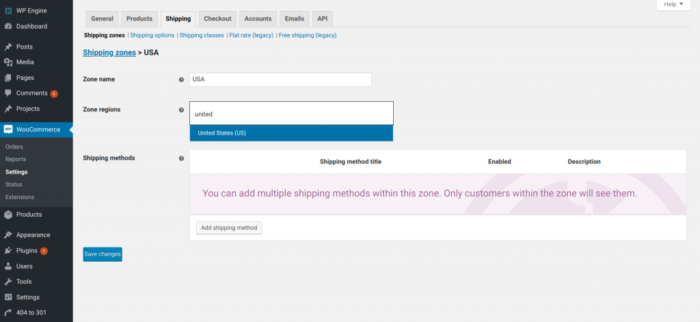
2. Go to “Shipping” > “Add shipping zone”
Once you’ve set your shipping location, go to the “Shipping” tab in your WooCommerce settings, then click “Add shipping zone.” This is where you’ll define shipping zones for your ecommerce store.
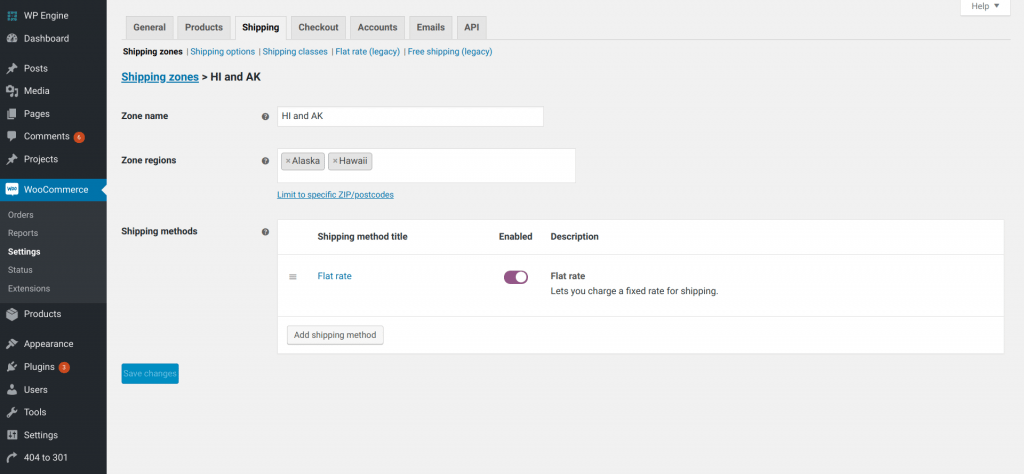
To add a new WooCommerce shipping zone, you’ll enter your Zone Name and define your Zone Region:
 It’s worth noting that shipping couriers like USPS use the term shipping zones to measure the distance a package travels on a scale from 1 to 8 in the contiguous United States — in groupings of postcodes, not miles — from the point of origin to the destination. These probably won’t match your WooCommerce shipping zones, and that’s fine! Just keep an eye out for this terminology elsewhere as you learn more about shipping.
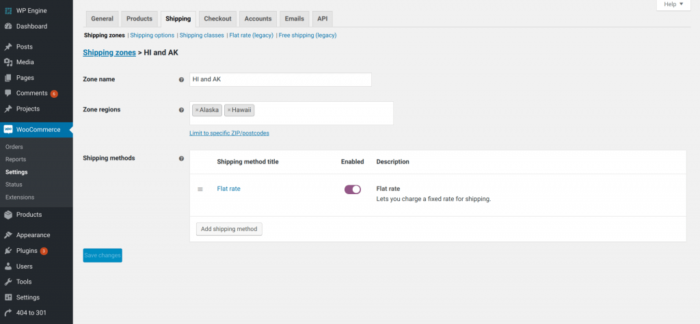
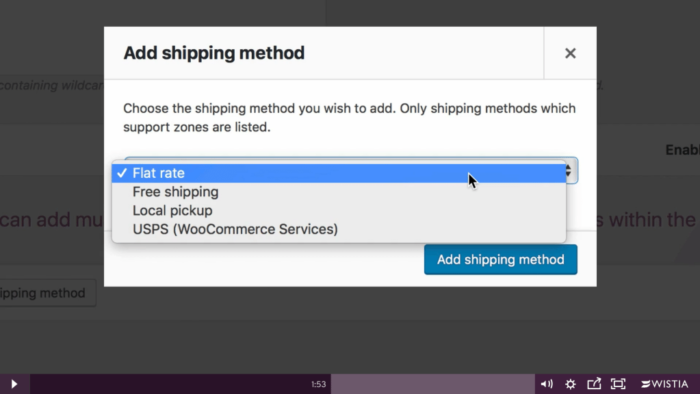
3. Add “Shipping methods” to each zone
Finally, you will need to assign shipping methods to your shipping zone. Depending on how you choose to fulfil orders on your WooCommerce store, shipping methods can include flat-rate shipping, free shipping, local order pickup, and more.
 At checkout, customers will only see the methods and rates available for their address and corresponding zone.
How to set up WooCommerce shipping rates
Once you’ve defined your shipping zones and methods, it’s time to decide how much customers will pay for each method.
If your method is free shipping, the customer shipping cost will, of course, be zero dollars. For local pickup, you can choose to set a fee or make it free. With WooCommerce Services shipping, you can add real-time USPS and Canada Post calculations on orders, then print shipping labels within WooCommerce.
For WooCommerce flat-rate shipping, you’ll have to set up exactly how you want your shopping cart to calculate the rate. Here’s how.
1. Choose a shipping zone
Under the “Shipping” tab, choose the shipping zone that you want to set up flat-rate shipping for.
2. Create flat-rate shipping fees
Once you choose your shipping zone and flat-rate shipping method, you’re ready to set up WooCommerce flat-rate shipping fees by clicking on “Flat rate” in the “Methods” box.
You can set up these fees several different ways, including:
- A flat shipping fee per order
- A flat shipping fee per item
- A shipping fee as a percentage of the order total
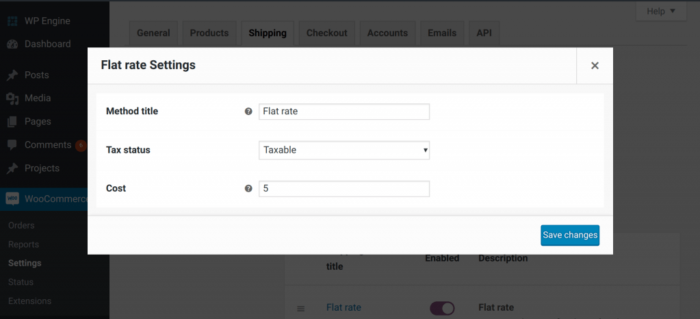
To set up your shipping fee on a per-order basis, you’ll choose a fee to apply to every order, such as $5 or $9.95. Then, enter that number in the “Cost” field:
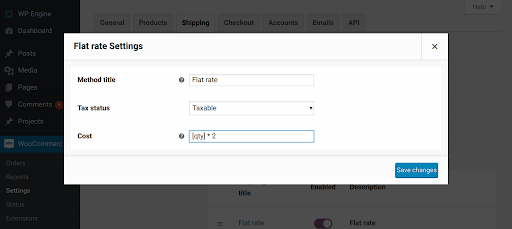
 To add a shipping fee on a per-item basis, you’ll choose a fee to apply to every item in an order, such as $2. Then, enter “[qty] * the fee” in the cost box — like this:
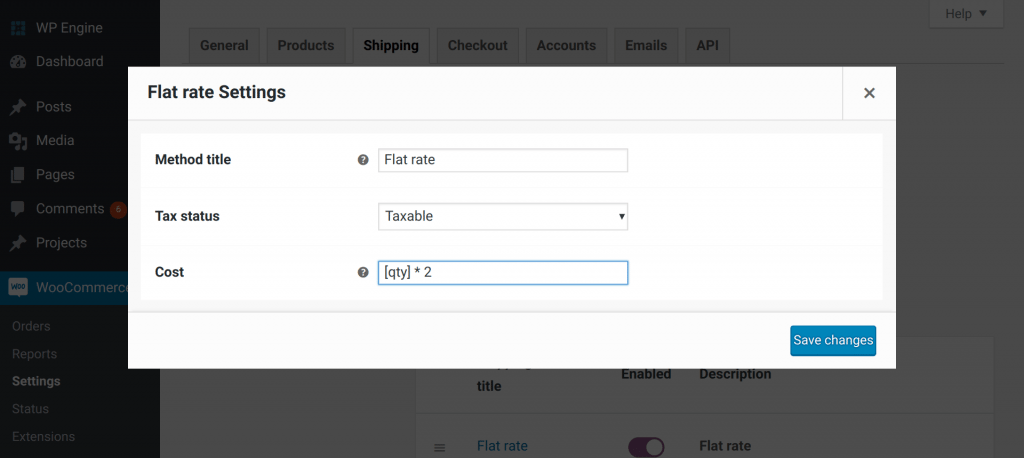 The above formula tells WooCommerce to multiply the number of items in a customer’s order by the fee you choose.
To add a shipping fee as a percentage of the order total, choose the percentage you’d like to charge, then enter “[cost * percentage as a decimal]” in the cost field:
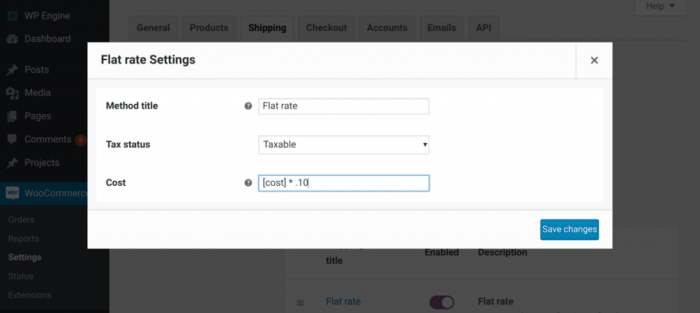 The above formula tells your WooCommerce shopping cart to multiply the total order cost by your chosen percentage in order to calculate your customer’s shipping fee.
How to set up shipping classes for product-specific charges with WooCommerce
Once you have your zones, methods, and rates set up, you can also set up shipping classes for specific products. Shipping classes are used to assign different shipping rates to different types of products. For example, you can assign different flat rate shipping costs to different product types grouped by sizes or weights.
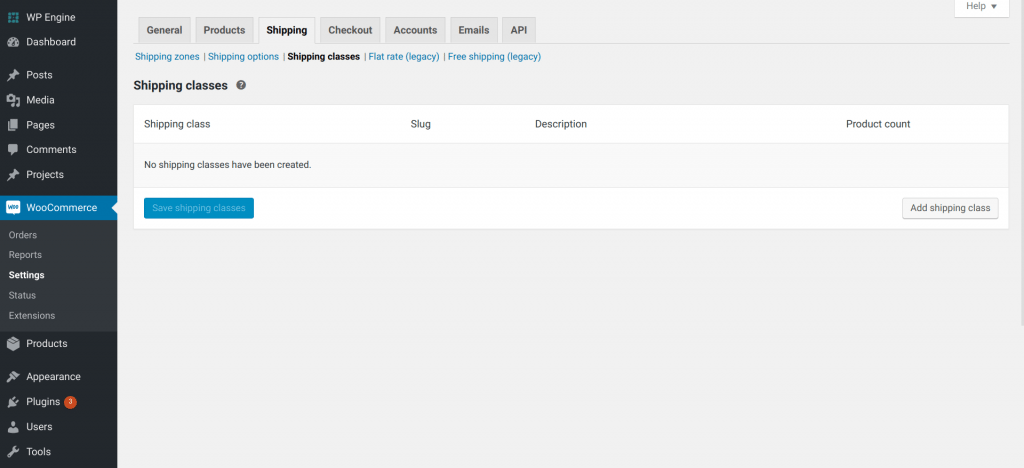
1. Go to “Shipping” > “Shipping classes”
Under the Shipping tab in your WooCommerce Settings, click “Add shipping class.”
2. Fill out shipping class information
Enter a Shipping Class Name and the description of the class. You can leave the Slug field blank — WordPress will auto-generate one for you. Then, click “Save shipping classes.”
3. Add shipping class costs to respective shipping zones
Next, you’ll need to assign each shipping class to a shipping zone and rate. This lets WooCommerce know what shipping option(s) and cost(s) to display when a customer purchases the product.
Under the Shipping tab, choose “Shipping zones,” then select the Zone where you want to edit the rate for this shipping class. Then, click on the rate you’d like to edit — for example, the flat-rate option. You’ll see an expanded “Flat-rate Settings” screen with a new section called “Shipping class costs:”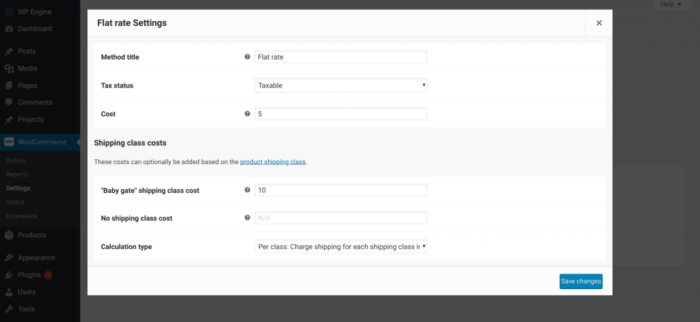
Here, enter how much you’d like to charge a customer in said shipping zone for flat-rate shipping on each shipping class.
For example, if you enter $10 next to the name of a shipping class, customers who choose flat-rate shipping for a product in that shipping class to be sent to the indicated shipping zone will pay $10.
4. Assign shipping classes to products
Once your shipping classes are defined and priced, you can add them to products. For example, if you have a shipping class specifically for bulky items, you’ll want to assign that rate to each item you deem bulky.
To do this:
- Go to WooCommerce > Products
- Select the product you want to assign the rate to and click “Edit”
- Select “Shipping” on the left-hand menu
- You’ll see a dropdown labelled “Shipping class” — select the shipping class you’d like to assign to the product
- Click “Update” to save changes
To bulk-assign shipping classes, see the instructions in the WooCommerce support docs.
What are the best WooCommerce shipping fulfilment options?
Depending on business size, order volume, location, and a variety of other factors, different ecommerce businesses have different needs. The best WooCommerce fulfilment option for your business might be different from that of your competitors.
The most common order fulfilment methods for managing WooCommerce logistics are in-house fulfilment, dropshipping, and outsourcing to a third-party logistics (3PL) provider. Here are the pros and cons of each option and how to figure out which is best for your WooCommerce store.
1. In-house fulfilment
Also called merchant fulfilment or self-fulfilment, in-house fulfilment means that you complete the entire order fulfilment process for your WooCommerce store yourself — from storing ecommerce inventory to shipping orders — without the help of a third party.
Many WooCommerce store owners choose to fulfil orders in-house when they first start their stores, often storing inventory and packing orders from home. You can use any of the WooCommerce shipping settings we mentioned earlier when fulfilling in-house.
In-house retail fulfilment can be expensive and time-consuming to scale. However, if you’re selling custom-made products or want to customise every package, it can be a great option to give you more control over the packing and shipping of each order placed on your WooCommerce store.
2. Dropshipping
If you’d rather take an ‘out of sight, out of mind’ approach to order fulfilment, dropshipping may be a better choice.
Dropshipping is a much more hands-off approach to order fulfilment. When a customer places an order on your WooCommerce store, the order details are forwarded to the manufacturer. The product then ships directly from the manufacturer to the end consumer.
While dropshipping requires minimal overhead and removes the need to store inventory yourself, it offers you little to no control over your ecommerce supply chain. Also, since many dropshipping suppliers are located overseas, shipping can take significantly longer and be more expensive than fulfilling orders domestically.
3. Third-party logistics (3PL)
Third-party logistics refers to outsourcing WooCommerce logistics, including inventory management and the picking, packing, and shipping of orders. 3PL providers like ShipBob allow merchants to outsource WooCommerce fulfilment rather than handling it in-house or working with a drop shipper.
“Getting our WooCommerce shop integrated with ShipBob was easy, and it’s been fantastic to have; we had no problem with it. We can see our orders come in and get fulfilled in real time. Our fulfilment is on autopilot. ShipBob saves us so much effort, and the opportunity cost savings has been substantial.”
Yannick Crespo, Co-Founder & President of Pot d’Huile
If you’re finding in-house fulfilment too expensive or time-consuming, working with a 3PL can help automate WooCommerce fulfilment — and help you get those piles of inventory out of your living room or garage. Working with a 3PL can free up time, allowing you to focus instead on managing and growing your WooCommerce store.
3PLs have the expertise and infrastructure needed to ship exceptionally large order volumes, making them invaluable as your business scales or needs to ramp up quickly, like during the busy holiday shopping season. If your business is growing fast or you’re already shipping more than a couple hundred orders each month, working with a 3PL can be a smart choice for your WooCommerce shipping.
WooCommerce shipping with ShipBob
If working with a 3PL seems like it could fit your WooCommerce shipping needs, consider working with ShipBob. ShipBob is a tech-enabled 3PL that provides WooCommerce fulfilment services as quickly and cost-effectively as possible to meet customers’ expectations.
Here’s how outsourcing WooCommerce fulfilment to ShipBob works:
1. Connect your WooCommerce store in minutes
ShipBob seamlessly integrates with WooCommerce, making it possible for you to link your store with the click of a button, then import your products and orders. The backend work is already done for you — no developer work needed.
2. Store inventory and ship orders from major US cities
ShipBob has fulfilment centres in major US markets, including Los Angeles, Chicago, Pennsylvania, and Dallas. Storing inventory and shipping from multiple fulfilment centres near your customers can reduce shipping costs and time in transit.
3. Have orders automatically fulfilled by ShipBob
When you connect your WooCommerce store to ShipBob, the staff at our fulfilment centres will receive picking lists to pick, pack, and ship items as soon as your customer places an order on your WooCommerce store.
ShipBob automatically routes the order to the fulfilment centre that can ship it to your customer in the most efficient and cost-effective manner.
4. Send shipping information back to customers
ShipBob’s technology lets you view the status of each order as it moves from processing to shipping. Once an order ships, ShipBob automatically sends a confirmation back to your WooCommerce store, so your customers receive order tracking information and stay updated throughout the delivery process.
Interested in seeing how ShipBob can make your WooCommerce shipping easier, faster, and more cost-effective? Request a quote below.


